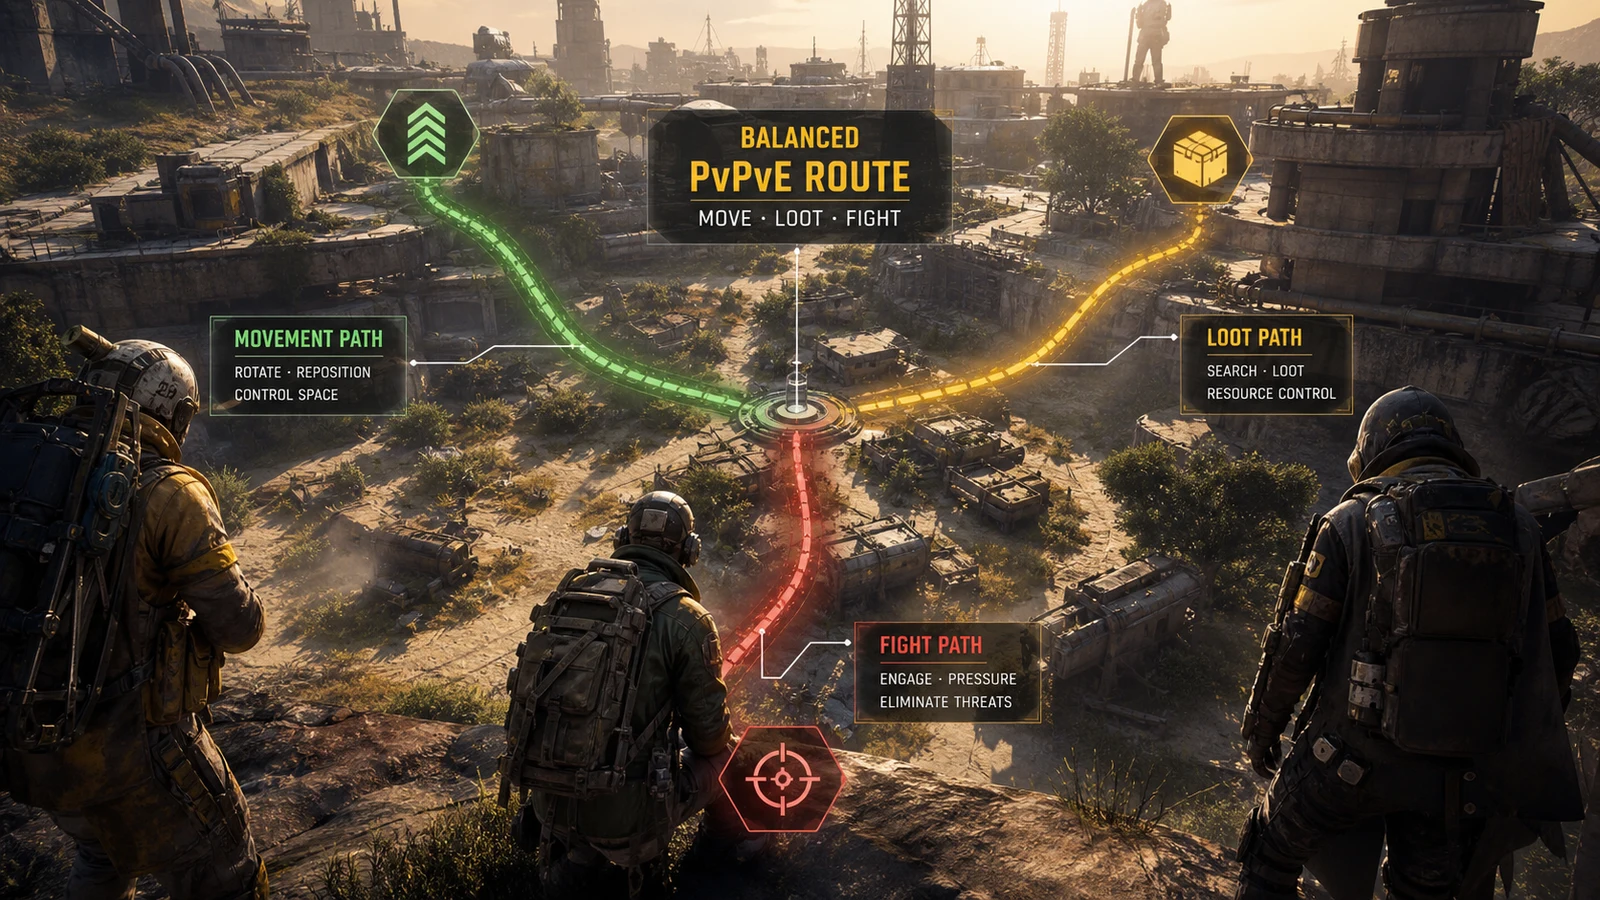
MOVERoute control
Mobility
Choose this when the failed raid starts with bad rotations, missed climbs, or no stamina left at extract.
We use cookies for language preferences, analytics, and Google advertising. You can accept optional cookies or keep only essential site storage. See the privacy policy.
La mejor calculadora del árbol de habilidades de Arc Raiders. Planifica tu build perfecta, descubre el mejor árbol y optimiza para PvP y PvE. Nuestra calculadora gratuita ofrece vistas previas de estadísticas en tiempo real.
Ya seas un raider novato o un veterano perfeccionando tu equipamiento de extracción, esta calculadora de Arc Raiders está diseñada para ayudarte a crear la build perfecta antes de comprometerte en el juego. Experimenta con las ramas de Mobility, Survival y Conditioning sin riesgos.
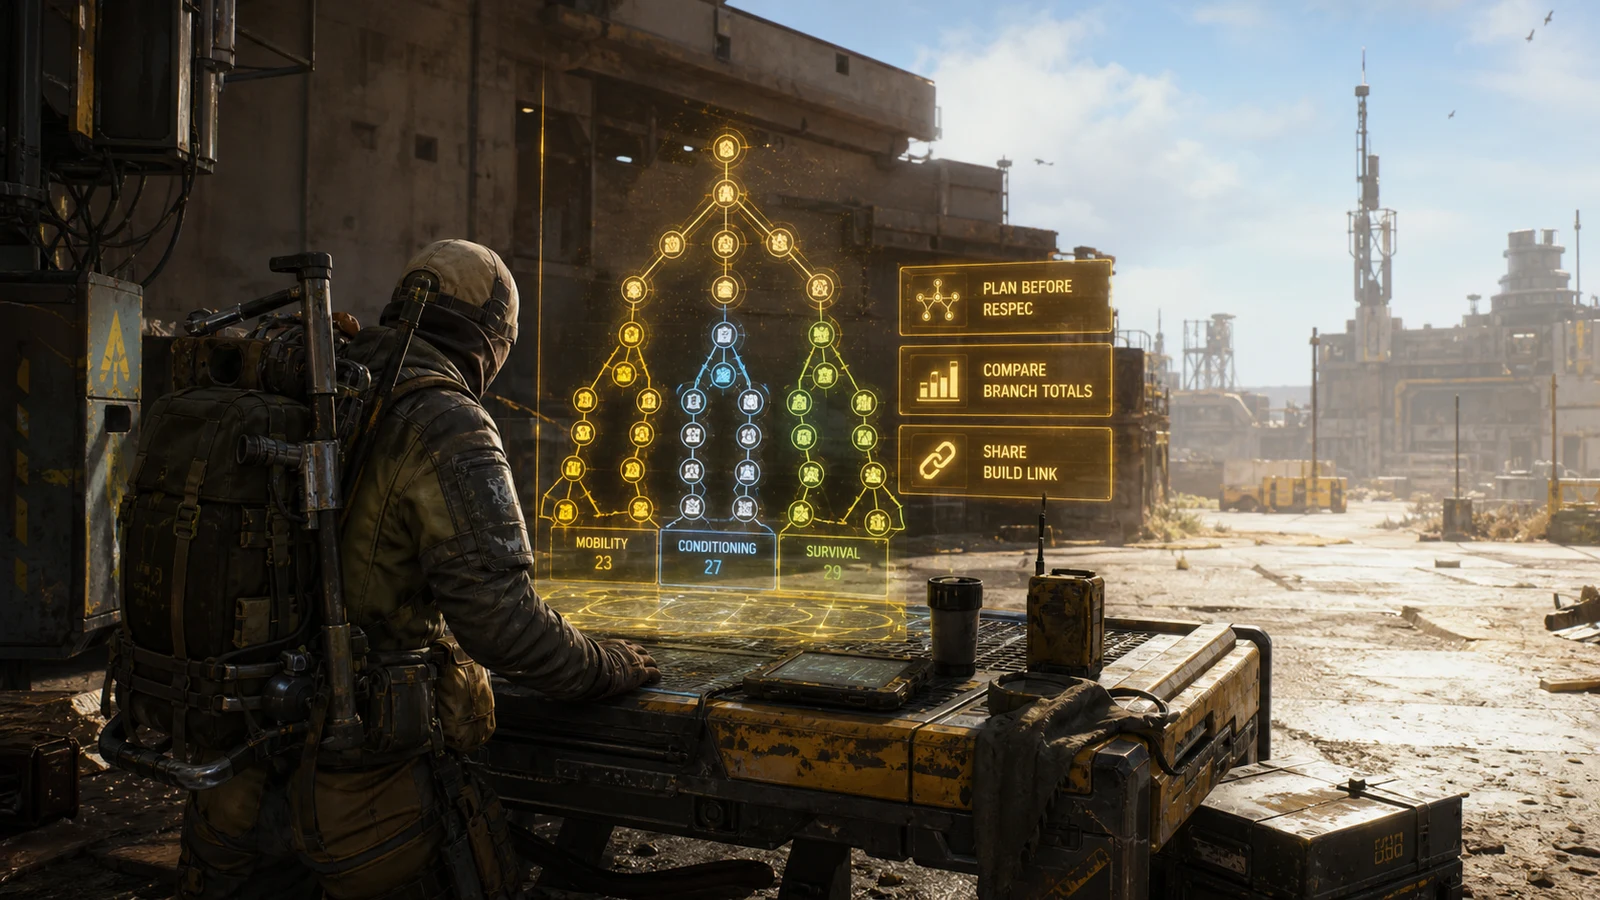
Planning workflow
Use the builder as a tactical draft board: set your point cap, compare branch pressure, and save links before changing your in-game route.
Test a full route online before spending in-game reset resources.
Check Mobility, Conditioning, and Survival pressure before copying a build.
Save multiple versions and send exact point paths to your squad.
Branch decision
Think in raid failures first: movement, loot value, or fight pressure. The branch table makes that choice explicit.

| Branch | Best For | Core Value | First Skills | Weakness |
|---|---|---|---|---|
| Mobility | Rotations, chasing, escaping, stamina-heavy raids | Keeps you moving when terrain and pressure decide the run. | Marathon Runner, Youthful Lungs, Nimble Climber | Can feel thin if you ignore loot and fight recovery. |
| Survival | Solo loot runs, quiet extracts, carry value | Turns clean raids into better profit and safer resets. | Agile Croucher, Looter's Instincts, Broad Shoulders | Less direct pressure if you constantly force PvP. |
| Conditioning | PvP pressure, heavy kits, long fights | Improves pressure tools once combat starts lasting longer. | Used To The Weight, Fight or Flight, Proficient Pryer | Needs movement support or it can feel slow. |
Choose this when the failed raid starts with bad rotations, missed climbs, or no stamina left at extract.
Choose this when you can stay alive but leave with weak loot, poor carry value, or no field options.
Choose this when fights last longer, shields feel heavy, or pressure windows decide the raid.
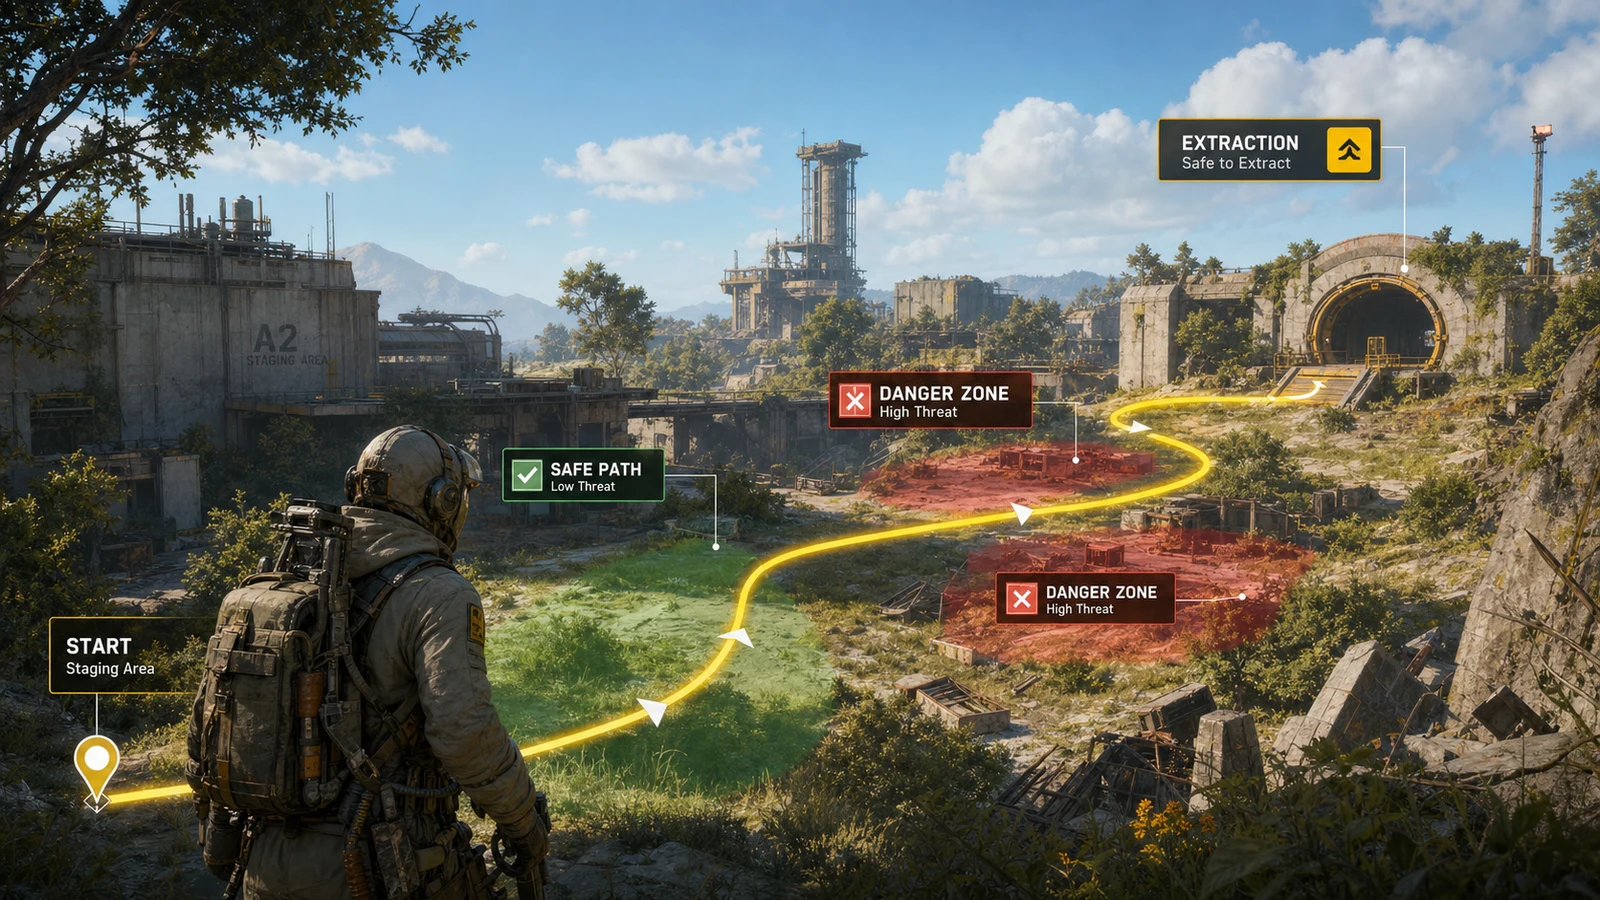
Starting routes
These are planning shapes, not fixed rules. Use them to decide where your next points should go.

Survival first
Build around crouch value, loot reading, carry space, and enough Mobility to leave bad routes.
Mobility + Conditioning
Keep stamina and repositioning high, then add fight recovery and pressure skills.
Even split
Use this when you want fewer weaknesses and expect both looting and fights every raid.
Mobility core
Start with movement and stamina, then add Survival once extracts become consistent.
Point cap progression
High-point builds are useful targets, but the playable version should match your current cap.
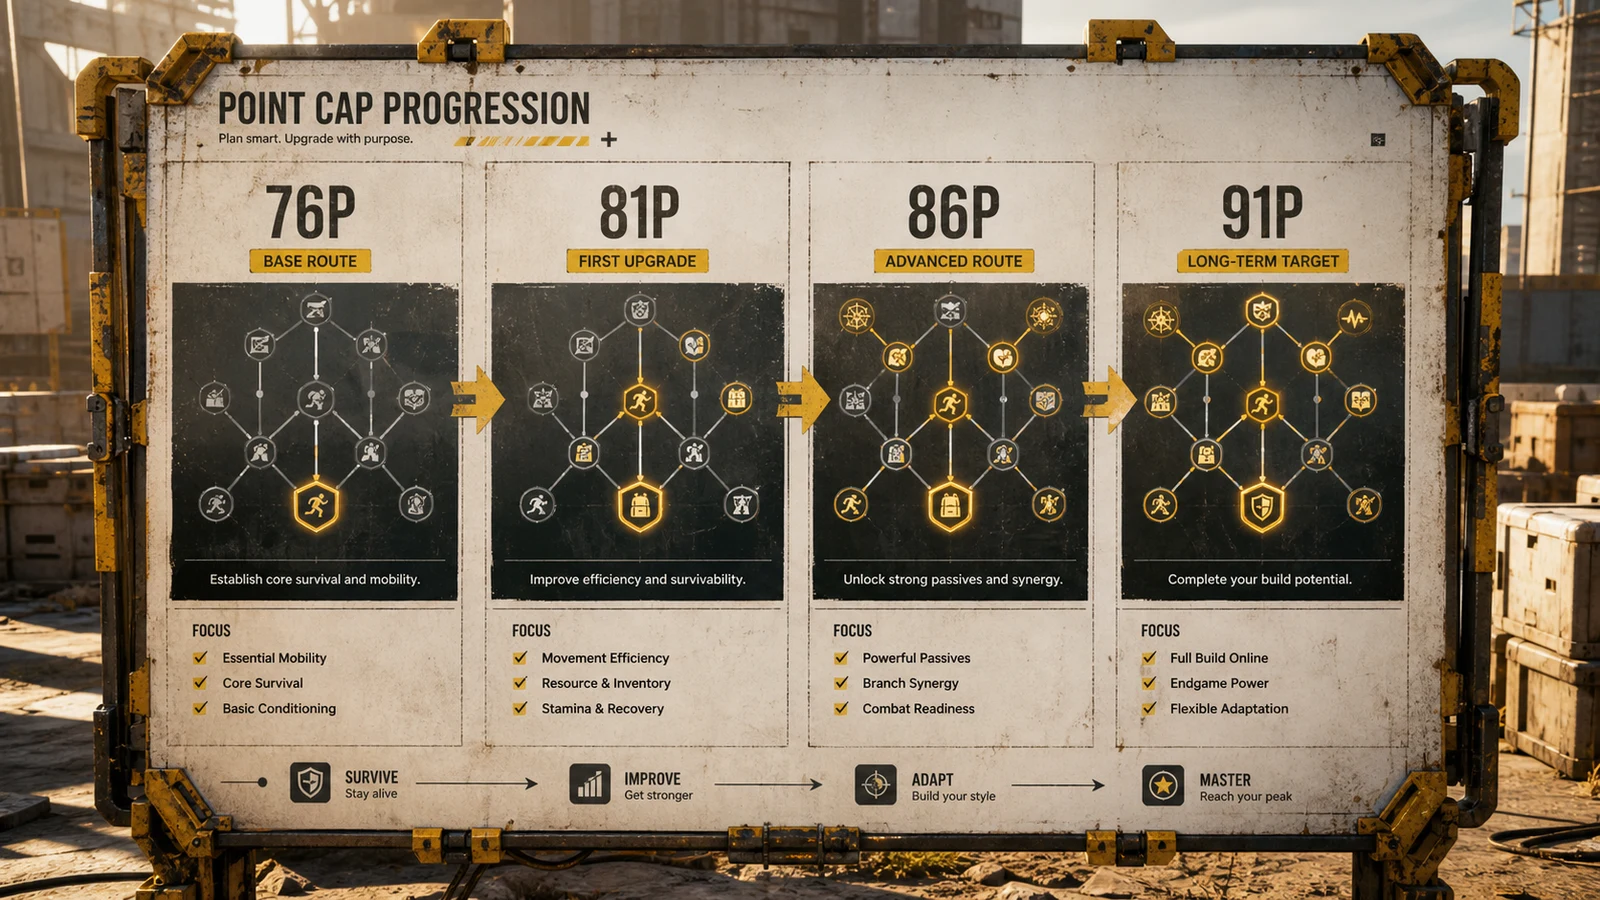
Stage 1
Use as the playable version if you have not earned extra Expedition points.
Stage 2
Add one branch-defining cluster without breaking your main route.
Stage 3
Most creator builds become easier to copy at this point range.
Stage 4
Use for final planning, not as a current build if your account is short.
Tfue skill tree build for ARC Raiders. A balanced 81-point 27/27/27 setup for movement, survivability, and loot efficiency.
PvP focused build with high conditioning and mobility. Features Turtle Crawl for aggressive push plays.
Balanced PvP build with strong conditioning and mobility. Great for aggressive playstyles.
Survival-heavy build focused on breach content. High survivability and looting efficiency.
High-mobility 86-point build with heavy investment into movement routing, stamina economy, and fast repositioning.
Tankier 86-point setup built around Turtle Crawl, recovery layers, and durable late-fight survivability.
PvE-oriented 86-point route that balances breach utility, loot sustain, and broad extraction consistency.
Version 3 of Taxi2g’s 81-point mobility build, tuned for faster rotations and efficient stamina conversion.
Earlier 81-point mobility variant with stronger Survival spend while preserving Taxi2g’s fast traversal core.
Original 81-point mobility setup with strong Conditioning backup and efficient traversal utility.
Crafting-oriented turtle variant with breaching utility, Turtle Crawl, and durable sustain for slower loot-heavy runs.
Standard turtle 81-point setup with layered Mobility, Conditioning resilience, and strong downed-game survivability.
Breach-focused 81-point build with heavy Survival utility and practical extraction-side PvE value.
Conditioning-heavy 76-point build centered on movement uptime, breaching efficiency, and durable utility.
Balanced 81-point build leaning into Conditioning with strong Survival utility and efficient mobility.
Well-rounded 81-point setup with solid mobility, conditioning depth, and dependable survival value.
Balanced 81-point creator build with fast movement, strong conditioning core, and stable survival coverage.
Conditioning-first 81-point setup with strong mobility support and practical loot-side survival tools.
Mobility and Conditioning focused 81-point setup tuned for tempo, stamina management, and reliable fights.
Survival-leaning balanced 81-point build with high looting utility and flexible combat mobility.
Balanced 81-point build with fast traversal, efficient breaching, and strong Survival utility.
Even 27/27/27 creator build with balanced movement, conditioning depth, and dependable survival utility.
76-point Taxi2g setup that drops In-Round Crafting in favor of stronger Mobility and broader Conditioning resilience.
76-point Taxi2g variant that keeps In-Round Crafting while preserving strong mobility tempo and Turtle sustain.
Survival-leaning 81-point build with strong Conditioning support and practical loot-side utility.
Conditioning-heavy 81-point creator build with excellent movement depth and stable survival coverage.
Mobility and Conditioning focused 76-point build with advanced traversal tools and controlled Survival spend.
Survival-heavy 76-point build with enough Mobility to stay fluid and a compact Conditioning core.
Loot-oriented 76-point build with deep Survival investment and a practical Conditioning base.
Tempo-focused 76-point build with strong Mobility core and enough Survival utility to stay efficient in fights.
Survival-maxed 76-point setup with a compact Mobility opener and efficient Conditioning support.
Arc Raiders utiliza un sistema de asignación dinámica. Al extraer con éxito, ganas puntos de habilidad para invertir en el árbol. Tu build no es permanente, pero reiniciar en el juego puede ser costoso.
Usar un constructor de árbol de habilidades online te permite calcular tus estadísticas finales antes de comprometer tus puntos. Es vital para equilibrar Mobility vs Endurance.
Estrategias avanzadas para optimizar tu árbol de habilidades
Movement is the safest early investment because it helps before, during, and after fights.
Loot skills turn clean raids into better extracts instead of empty survival.
Fight skills matter most after your movement route is already stable.
One utility point can save a long raid when supplies run thin.
Plantillas recomendadas para cada estilo de juego

Para Supervivencia
Se centra en la supervivencia y el botín.
Usar Build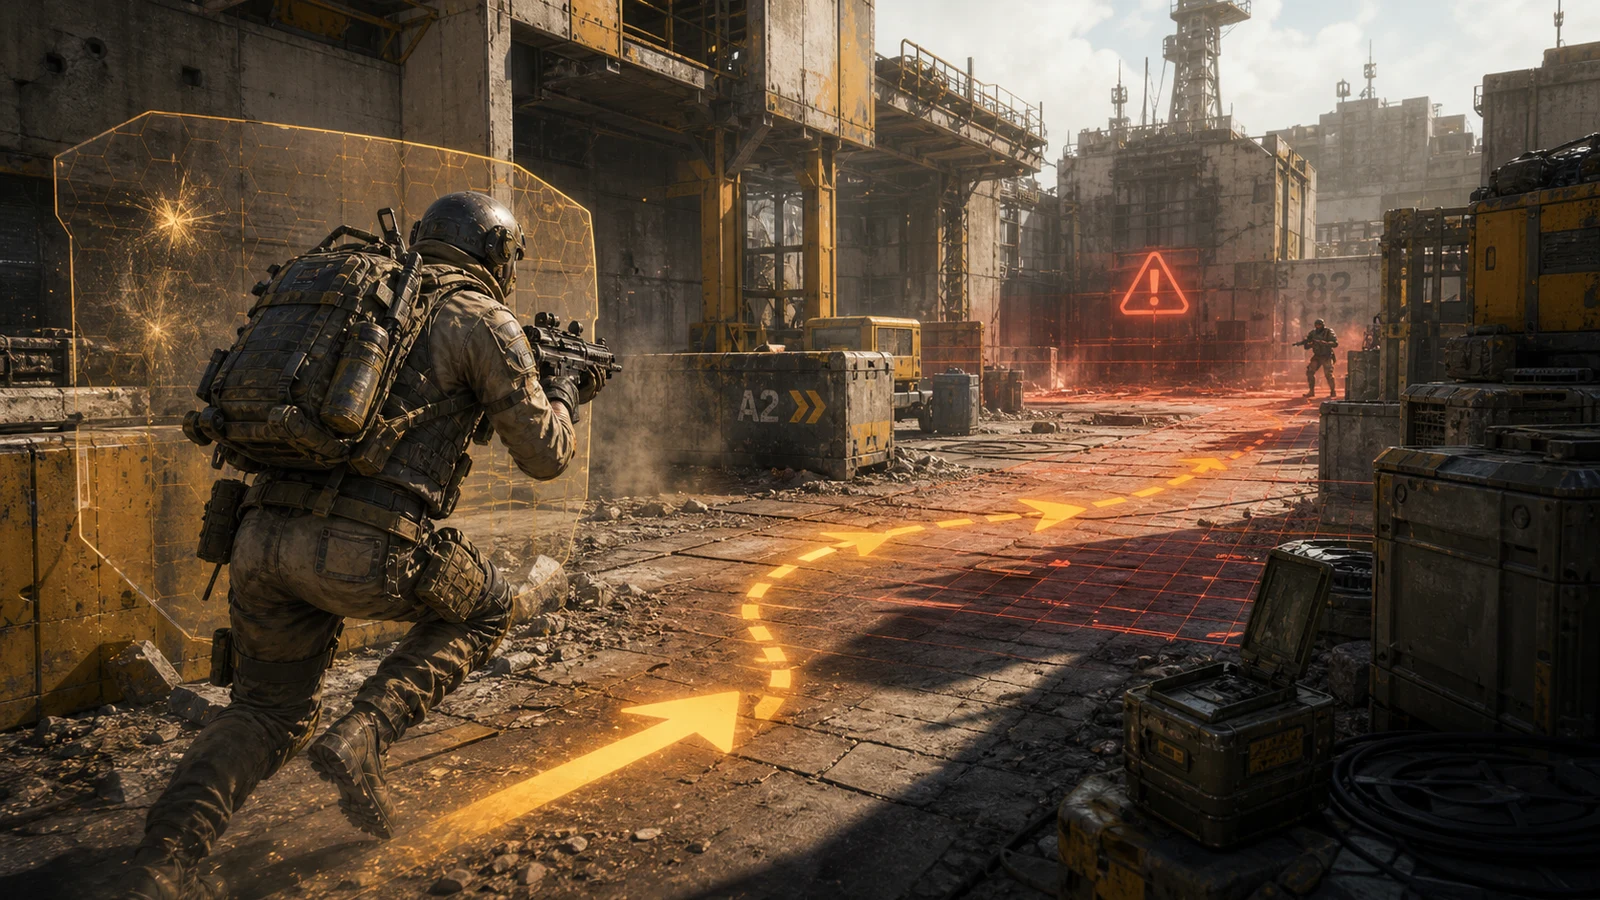
Para Competitivo
Se centra en ventajas de movimiento para dominar al contrincante.
Usar Build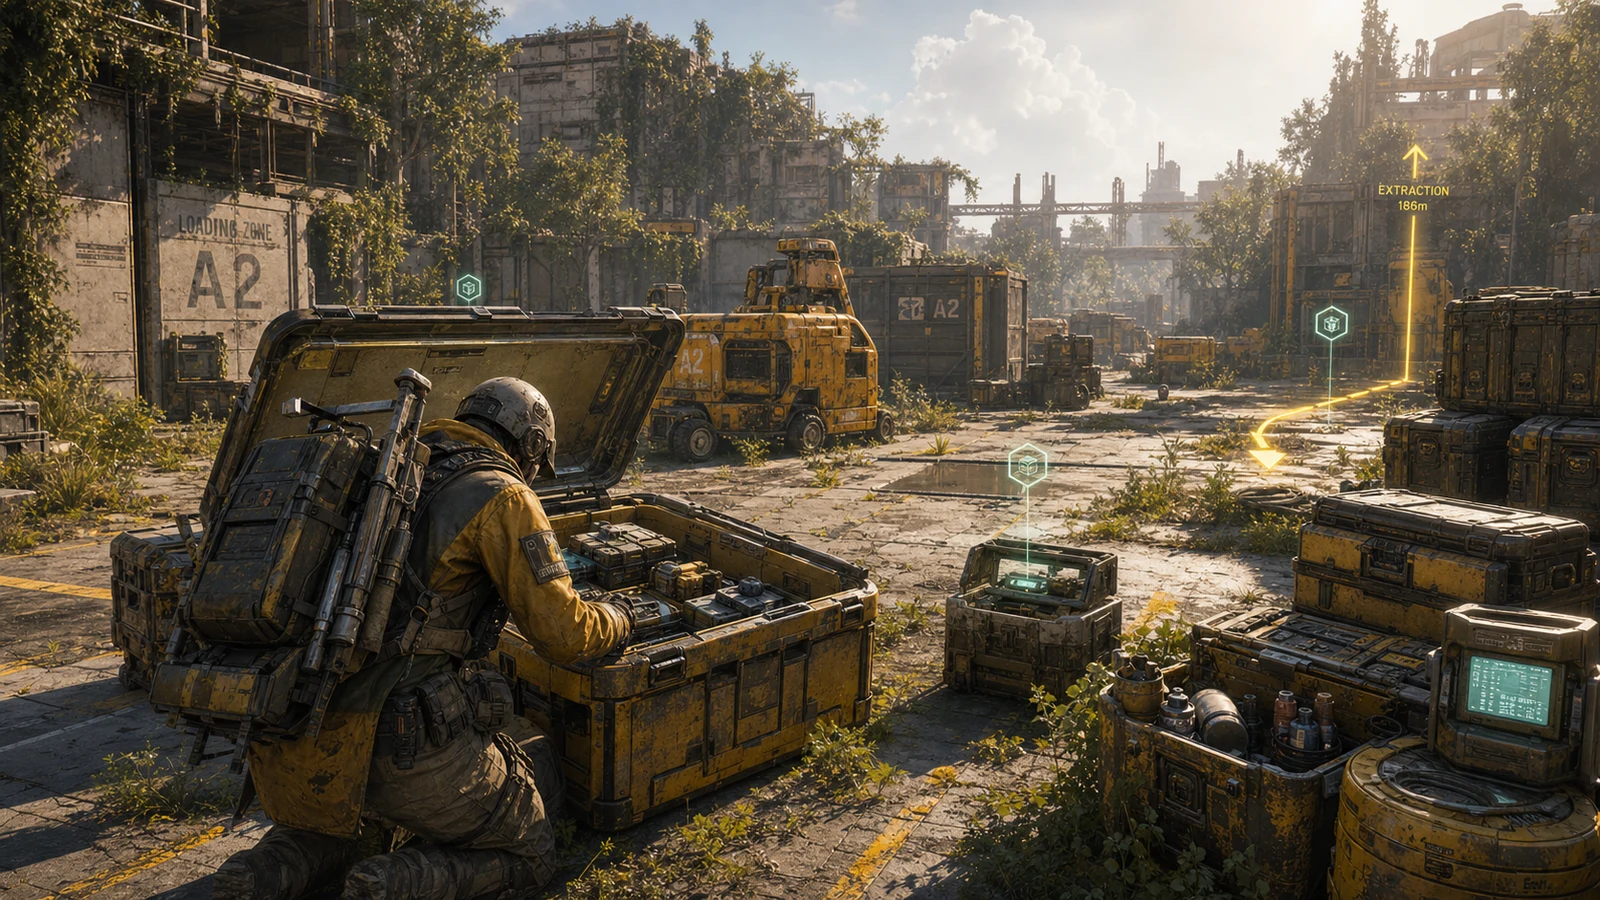
Para Recolección
Navega eficientemente y recoge botín rápido.
Usar BuildAsignaciones esenciales para tu progreso
Arc Raiders es un juego duro. Usar nuestra calculadora online te permite no equivocarte en medio de los clics.
Ya seas jugador solitario o de escuadrón, planificar es clave. Nuestra herramienta te permite:

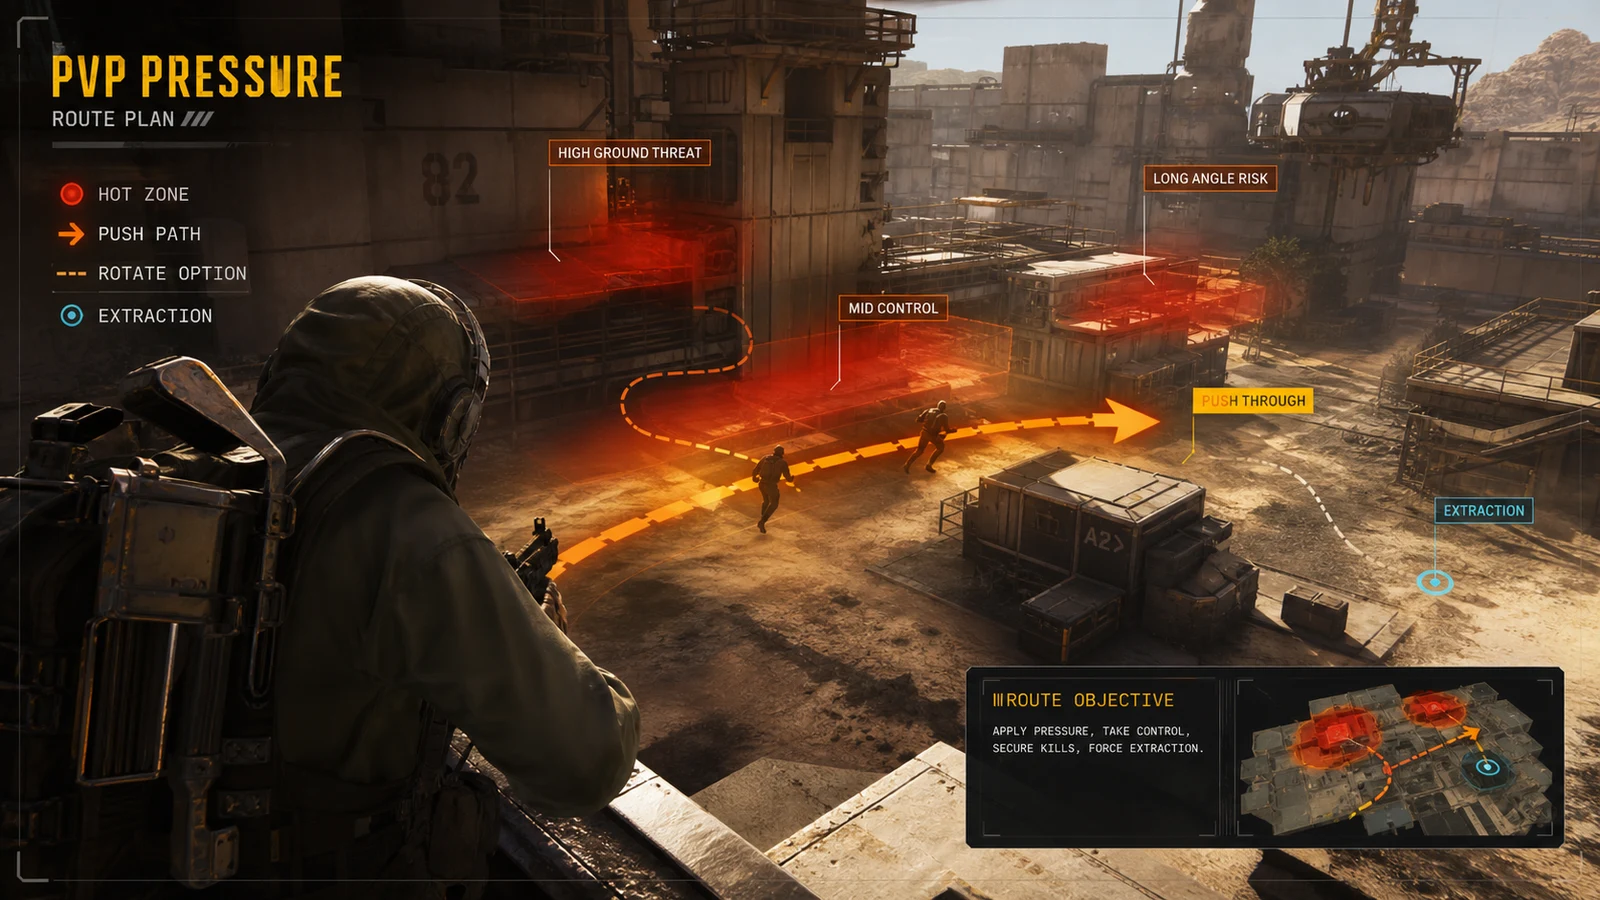
Build analysis
cloakzy / Fight-first Turtle pressure route / 81 points
This route is for players who expect contested raids and want a clear PvP identity with enough Mobility to enter or leave pressure windows.
Creator
PvP focused build with high conditioning and mobility. Features Turtle Crawl for aggressive push plays.
Point split
Mobility / Conditioning / Survival distribution.
Published
Use the date as context when comparing older and newer point caps.
Defines the pressure identity of the build.
Helps reset when fights stretch longer.
Supports heavier combat kits.
Keeps rotations active before the fight starts.
Improves safety when repositioning under pressure.
Keeps fight wins profitable enough to extract.
| Point cap | Adjustment advice |
|---|---|
| 76p | Keep Turtle Crawl support and remove non-essential loot comfort first. |
| 81p | Preserve Mobility stamina plus Conditioning pressure, then add Survival value. |
| 86p | Use remaining points to restore carry and loot consistency. |